Alfodoo Installation guide
To install the Alfodoo addons, there are several important steps:
- Install the dependencies (the Odoo cmis addon and the Python cmislib library).
- Make sure Alfresco is properly configured to accept AJAX requests. from your Odoo domain
- If your Alfresco is behind a reverse proxy, make sure all it’s components are properly configured.
- Launch Odoo with the adequate options.
- Configure the Alfresco URL and credentials in your Odoo instance.
Please read the following sections carefully to ensure a smooth experience with Alfodoo.
Dependencies
The Alfodoo framework requires the following:
- The Odoo cmis addon: provides the foundation for Odoo modules implementing different integration scenario with a CMIS server. It allows you to configure a CMIS backend. This addon is maintained by the OCA and is on the Odoo app store as well as on github as part of the connector-cmis repository.
- cmislib the Apache Chemistry CMIS client library for Python: To be compliant with the latest version of CMIS (1.1), the connector uses the latest version of the python cmislib>=0.6. The library can be installed with:
pip install 'cmislib>=0.6'
Enable CORS in Alfresco 5.x
The CMIS Viewer widget will be loaded from a different web server than the Alfresco Platform is running on. So we need to tell the Alfresco server that any request that comes in from this custom web client should be allowed access to the Content Repository. This is done by enabling CORS.
To enable CORS in the Alfresco Platform, you should do the following:
Modify tomcat/conf/web.xml and add the following sections to allow requests from http://localhost:8069 in addition to http://my.public.alfresco.hostname. When specifying the cors.allowOrigin URL make sure to use the URL that will be used by the web client.
<!-- CORS Filter Begin -->
<filter>
    <filter-name>CORS</filter-name>
    <filter-class>org.apache.catalina.filters.CorsFilter</filter-class>
    <init-param>
      <param-name>cors.allowed.origins</param-name>
      <param-value>http://localhost:8069,https://my.public.alfresco.hostname</param-value>
    </init-param>
    <init-param>
      <param-name>cors.allowed.methods</param-name>
      <param-value>GET,POST,HEAD,OPTIONS,PUT,DELETE</param-value>
    </init-param>
    <init-param>
      <param-name>cors.allowed.headers</param-name>
      <param-value>origin, authorization, x-file-size, x-file-name, content-type, accept, x-file-type, DNT, x-customheader ,keep-alive ,user-agent ,x-requested-with ,if-modified-since, cache-control,accept-ranges,content-encoding,content-length</param-value>
    </init-param>
    <init-param>
      <param-name>cors.exposed.headers</param-name>
      <param-value>origin, authorization, x-file-size, x-file-name, content-type, accept, x-file-type, DNT, x-customheader ,keep-alive ,user-agent ,x-requested-with ,if-modified-since, cache-control,accept-ranges,content-encoding,content-length</param-value>
    </init-param>
    <init-param>
      <param-name>cors.support.credentials</param-name>
      <param-value>true</param-value>
    </init-param>
    <init-param>
      <param-name>cors.preflight.maxage</param-name>
      <param-value>3600</param-value>
    </init-param>
 </filter>
 <!-- CORS Filter End -->

 <!-- CORS Filter Mappings Begin -->
 <filter-mapping>
    <filter-name>CORS</filter-name>
    <url-pattern>/api/*</url-pattern>
    <url-pattern>/service/*</url-pattern>
    <url-pattern>/s/*</url-pattern>
    <url-pattern>/cmisbrowser/*</url-pattern>
 </filter-mapping>
Alfresco Behind a a Proxy
The CMIS discovery document returns absolute template URLs that have to be used to navigate the repository and retrieve node information. This service is the first one called when a cmis session is initialized and the next calls will use the url received into the result. By default the hostname of the server is returned in the URLs, if the server is behind a proxy the hostname needs to be configured to return the publicly accessible hostname. If you are in this case you must add the following lines into the alfresco config file in <tomcat>/shared/classes/alfresco-global.properties
# if true, the context path of OpenCMIS generated urls will be set to "opencmis.context.value", otherwise it will be taken from the request url
opencmis.context.override=true
opencmis.context.value=
# if true, the servlet path of OpenCMIS generated urls will be set to "opencmis.servletpath.value", otherwise it will be taken from the request url
opencmis.servletpath.override=true
opencmis.servletpath.value=
opencmis.server.override=true
opencmis.server.value=https://my.public.alfresco.hostname/alfresco/api
Configure python SSL certificates
Moreover if alfresco is available over SSL (HTTPS) you must also take care of trusting the SSL certificate in your Odoo instance. This can be done by adding the following lines in your custom odoo addon.
import httplib2
import functools

# Set system CA Certificates based SSL Certificate Validation by python code
httplib2.Http = functools.partial(
    httplib2.Http,
    ca_certs="/etc/ssl/certs/ca-certificates.crt"
)
Launch Odoo
The cmis_field addon defines a new field and a specific web controller providing some functionalities to the web. In order to get the new field desciption registered at the early stage in the statup process and to register the controller you must start Odoo with:
--load web,web_gantt,cmis_field
Configure the CMIS connector
In Odoo, go to Settings > CMIS > Backends and create a new backend.
Populate the following fields:
- Location: the CMIS root URL, example
https://my.public.alfresco.hostname/alfresco/api/-default-/public/cmis/versions/1.1/browser/ - Username, Password: the Alfresco credentials that Odoo will use to create new folders and associate their object reference to the Odoo record. It is recommanded to create a dedicated Alfresco user for this.
- Inital directory for writing: the base Alfresco directory where Odoo will create folders and store documents (eg /odoo).
- Alfresco Api Url: usually
https://my.public.alfresco.hostname/alfresco/s/api. - Alfresco Share Url: usually
https://my.public.alfresco.hostname/share.
How to link a CMIS documents folder to an Odoo model
The main usage of theses addons is to let you extend an existing Odoo model to link an instance of this model to a folder in a CMIS container.
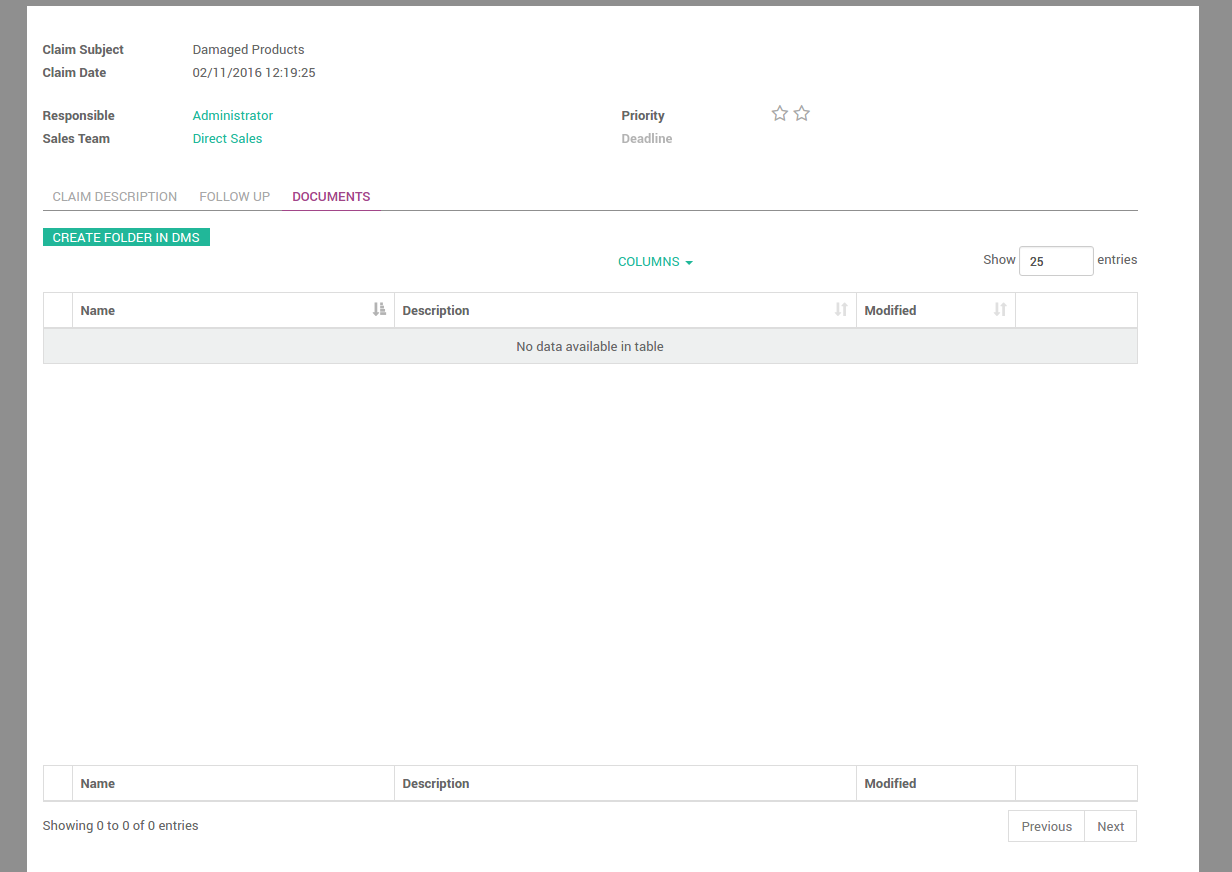
As an example, we’ll see the steps to extend the Customer Claim object to store the documents related to a claim into a CMIS container
from openerp import models
from openerp.addons.cmis_field import fields


class CrmClaim(models.Model):
    _inherit = 'crm.claim'

    cmis_folder = fields.CmisFolder()
<?xml version="1.0" encoding="UTF-8"?>
<odoo>
    <record id="crm_case_claims_form_view" model="ir.ui.view">
        <field name="name">CRM - Claims Form (cmis_crm_claim)</field>
        <field name="model">crm.claim</field>
        <field name="inherit_id" ref="crm_claim.crm_case_claims_form_view"/>
        <field name="arch" type="xml">
            <notebook position="inside">
                <page string="Documents" groups="base.group_user">
                    <field name="cmis_folder"/>
                </page>
            </notebook>
        </field>
    </record>
</odoo>
The result is a new Document tab displayed on the Claim Odoo model.
Then you are able to see all the documents related to the claim on the claim object itself, and do all your work into odoo (such as documents drag&drop, preview, …) even if your documents are stored into a cmis container
